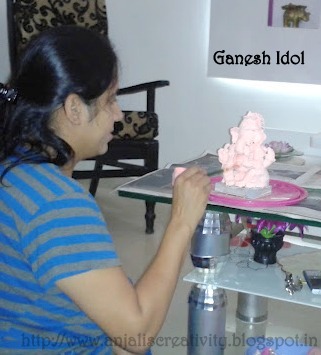
Click here on Anjali's Creativity to Shop Here

Diya

Tuesday, September 18, 2012

Ganesh Idol Making

Ganesh Idol Making


If you are looking to be creative and eco-friendly this Ganesh Chaturthi, then you can make Ganesh idols at home. Ganesh idols can be made at home using clay (Shadu).
 f you are buying a Ganesh idol, please opt for an environment friendly Ganesha.


Material:
  • Shadu (Clay)
  • Fevicol
  • Wooden block (2X2)
  • Wooden stick
  • Tooth pick
  • Paints
  • Paint brushes
  • Rough cloth
  • Kundun or decorative stones to decorate the idol

Preparation:

  1. Mix the clay. You can get clay from stationary stores during Ganesh festival. In Pune you can get it at Kumbharwada.
  2. While mixing the clay and using it, make sure that your hand is slightly wet.

3. Take the wooden block and apply fevicol over it.

4. Take the 1 kg clay and divide it in to 8 equal portions.
5. 1st portion should be used to prepare shape like trapezoid. Fix on the wooden block as shown below. 


6. Take 2nd portion and half of 3rd portion. Mix it well and prepare a round. Then divide that in 2 parts. Make 2 legs shapes like carrot. Bend in between for making knees. Merge the same with hind part.

7. Add Kasota to pitambar as shown. Apply little water for smooth texture.
8. Take the 3rd portion remaining half and add to 4th portion to make it 1.5 portions. Make a round of it. Mix well. Now make 3 parts of it. Out of that mix 2 portions and make stomach for the Ganesh idol. Place it back upright. Add residual portion for shoulder and chest part.
9. Now take 5th portion. Make 4 parts of it to make 4 hands. Prepare rare hands first. Ensure the palm is not thin to avoid breaking.
10. Prepare uparna and fix it on shoulder.
11. Now take 6th portion. Divide it in to 3:1 . Take bigger portion for head. Remaining portion to be used for preparing trunk. 

12. Take 7th portion. Divide in to 3 parts. 1 part for ears. , 1 part for crown (cone shape) (mukut), 1 portion for the chakra behind the crown (mukut).
13. You can prepare ornaments of the remaining 8th portion as shown below. Also prepare 1 Modak to keep on Ganesha's left palm. :-)
 
14. Using a brush smoothen the exterior. Make sure that you don’t damage the structure.
15. Now leave the Ganesha to dry but not in direct sunlight as cracks may appear.
16. When the idol is dry use acrylic tint flesh shade for coloring the whole idol in body color. Allow it to dry.

  
17. You can color the Ganesha pithambar and the uparna/ shella by your choice colors. We had prepared 2 Ganesh idols as this time in my creativity my brother had also joined me :). So we both had prepared 1 idol each.
   
18. Use golden color for the crown, chakra and the ornaments.
   
19.You can draw eyes and other aspects like tilak, eyebrows etc.
20.You can use acrylic paints to enhance the beauty of Ganesha.


 21.You can also decorate the idol with colorful stones and kunduns.
 

 Here is the eco-friendly ganesh idol.

Monday, May 28, 2012

GLASS PAINTING


GLASS PAINTING


Glass painting is a contemporary art which has been derived from the age old art of stained glass painting which involves putting smaller colored pieces of glass together. It was a common feature in high windows and doors etc in the olden times and can still be seen in churches and old buildings. We had these types of glasses at my Grandmother’s house.  These days glass painting is becoming a popular feature and catching up as a hobby due to its awesome results and easy availability of glass painting equipment.
At home glass paintings can be as wall hangings, wine glasses painting, on windows, acrylic sheets, cups, mugs, tiles, mirrors etc. If you are interested in glass painting and want to try it, go ahead and experience the joy! All you need is a glass piece, sheet of paper, glass paints, an outliner, a design, silver foil or colorful paper (if required) and some amount of patience. J

Materials:

  • Rectangular or Square Glass piece
  • Glass Liner
  • Glass paints
  • Thinner
  • Glue
  • Aluminum foil or Colored papers
  • Boldly traced designs/ drawings


Method:


  • First place the drawing on the table and then place the plain glass above the drawing, so that the drawing/picture is clearly seen through the glass.
 

  • Make the outline of the trace on the glass with glass liner. Allow it to dry.
 

  • Before you start painting on the glass tests your shades on some rough glass. You can wipe it off with thinner.
  • The color choice should be perfect because the stained glass paint gets dried up fast and the correction cannot be done easily.
  •  While painting, the color blending should be done quickly and carefully. 
  • When the whole painting and the border gets dried, remove the trace.


  • From the back side of the glass painting paste a colorful paper sheet or crushed aluminum foil.

  • Now your glass painting is ready. You can get it framed.


Tip: Once the painting has dried see it against a source of light. This will tell you the portions where the paint is less or thin. If required, do another coating of paint on it. 

Friday, May 25, 2012

Wall Hanging

WALL HANGING WITH CD


Materials Required:


  • CD
  • Glass paints
  • Glass Liner
  • Decorative kundan
  • Decorative beads
  • Aluminum Foil
  • Satin ribbon or decorative threads

Method :
Waste CD’s can be painted with glass colors with your own patterns and designs.

  • Take a CD with shinny surface facing up.
 
  • Draw the outline of the drawing you want to make on the CD by the glass liner. Allow it to dry. 
 
  • Paint the CD with glass paints of your choice.
 
  • Cover the back side of CD by Aluminum foil.
  •  Decorate it with kundan and beads.


  • Prepare 3 CD'sand paste one by one on a satin ribbon or colorful thread.

 
  • It can be either hanged on the wall or decorated CD’s can be hanged in the car.


CD Painting


CD Painting


I saw lot of waste CD’s in my home so thought of doing something with that so I painted the CD’s with glass liner and glass paints.


Materials Required:
  • CD
  • Glass paints
  • Glass Liner
  • Decorative beads
  • Decorative buttons
  • Decorative tiklis
  • Aluminum Foil
Method :
Waste CD’s can be painted with glass colors with your own patterns and designs.


  • Take a CD with shinny surface facing up.


  • Draw the outline of the drawing you want to make on the CD by the glass liner. Allow it to dry. 


  • Paint the CD with glass paints of your choice.

    • Cover the back side of CD by Aluminum foil
     

    • Decorate it with colorful beads and buttons and tiklis.


    • It can be used as rangoli in front of god or can be used as floating rangoli in living room center table or on dinning table or rangoli to be arranged around the lunch plate on the special occasions as shown below: